
This how-to creates a UGC Asset Candidate, adds information to it, and promotes it to an Asset that other players can see in your game.
Prerequisites
Section titled “Prerequisites”- Unity, Unreal, or Godot SDK installed and configured in your project (not required for REST).
- An active Player session (see Authentication).
- (Optional) A Context for the new UGC item. If you don't provide one, LootLocker assigns a default Context.
Create an Asset Candidate
Section titled “Create an Asset Candidate”The first thing a player does is create an Asset Candidate, the "working state" of UGC in LootLocker.
// Name is required when creating an asset candidatestring name = "New Asset Candidate";
// The below additional variables are optionalDictionary<string, string> kv_storage = new Dictionary<string, string>();kv_storage.Add("key", "value"); // OptionalDictionary<string, string> filters = new Dictionary<string, string>();filters.Add("key", "value"); // OptionalDictionary<string, string> data_entities = new Dictionary<string, string>();filters.Add("data", "name"); // Optionalint context_id = -1; // Optional
string asset_candidate_id = "";LootLockerSDKManager.CreatingAnAssetCandidate(name, kv_storage, filters, data_entities, (response) =>{    if (response.success)    {        Debug.Log("Successfully created asset candidate with ID: " + response.asset_candidate_id);        // Save the asset_candidate_id for future requests        asset_candidate_id = response.asset_candidate_id;    }    else    {        Debug.Log("Error creating asset candidate");    }});
See the Reference Documentation for a list of supported properties.
Coming soon — this sample hasn't been written yet. In the meantime, refer to the Reference Documentation for this endpoint.
curl -X POST "https://api.lootlocker.io/game/v1/player/assets/candidates" \ -H "x-session-token: your_token_here" \ -H "Content-Type: application/json" \ -d "{\"data\": {\"name\": \"My UGC Asset\"}}"See the Reference Documentation for a list of supported properties.
Modify an Asset Candidate
Section titled “Modify an Asset Candidate”After creating an Asset Candidate, you can modify it in several ways.
Delete an Asset Candidate
Section titled “Delete an Asset Candidate”int assetCandidateID = 13;LootLockerSDKManager.DeletingAnAssetCandidate(assetCandidateID, (response) =>{ if (response.success) { Debug.Log("Successfully deleted asset candidate"); } else { Debug.Log("Error deleting asset candidate"); }});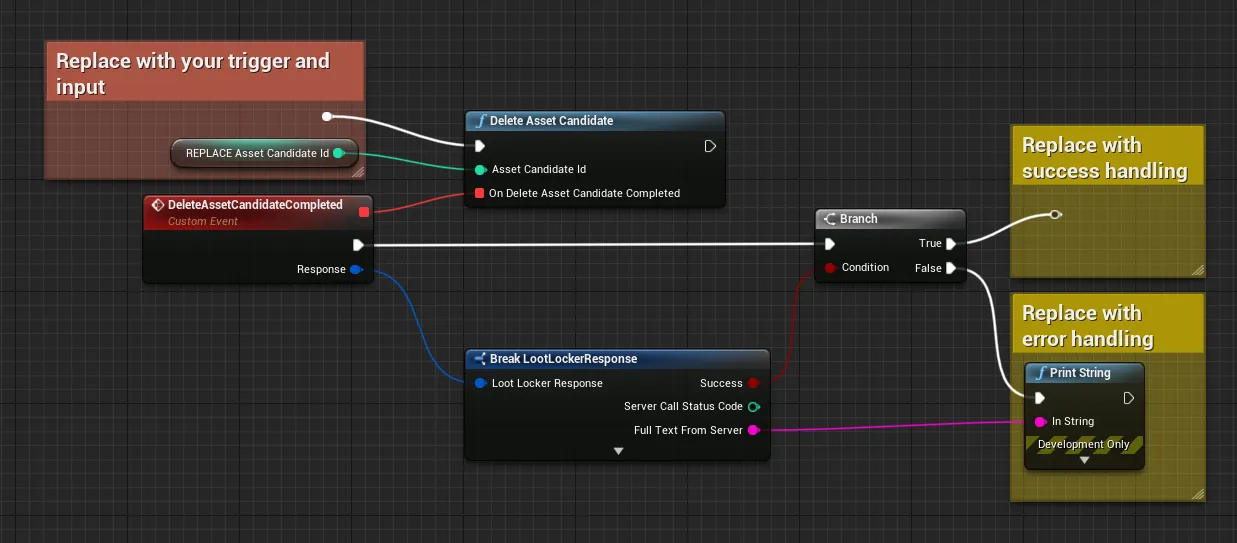
Coming soon — this sample hasn't been written yet. In the meantime, refer to the Reference Documentation for this endpoint.
curl -X DELETE "https://api.lootlocker.io/game/v1/player/assets/candidates/1234" \ -H "x-session-token: your_token_here"Add Files to an Asset Candidate
Section titled “Add Files to an Asset Candidate”int assetCandidateID = 12;string filePath = "Assets/Resources/300.jpg";string fileName = "300.jpg";LootLocker.LootLockerEnums.FilePurpose fileType = LootLocker.LootLockerEnums.FilePurpose.primary_thumbnail;LootLockerSDKManager.AddingFilesToAssetCandidates(assetCandidateID, filePath, fileName, fileType, (response) =>{ if (response.success) { Debug.Log("Successfully added image to asset candidate"); } else { Debug.Log("Error adding image to asset candidate"); }});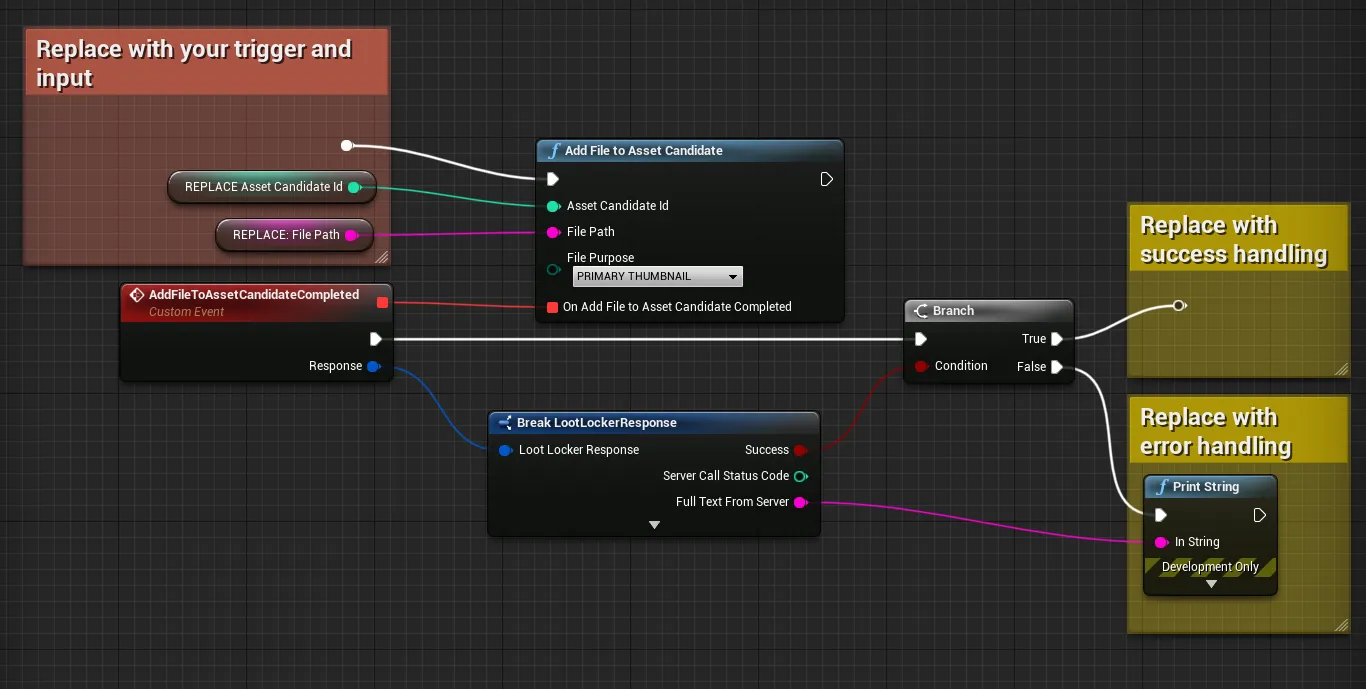
Coming soon — this sample hasn't been written yet. In the meantime, refer to the Reference Documentation for this endpoint.
curl -L -X POST 'https://api.lootlocker.io/game/v1/player/assets/candidates/1234/file' \ -H "x-session-token: your_token_here" \ -F 'file=@/path/to/file.ext' \ -F 'purpose=PRIMARY_THUMBNAIL'Remove Files from an Asset Candidate
Section titled “Remove Files from an Asset Candidate”int assetCandidateID = 12;int fileID = 1;LootLockerSDKManager.RemovingFilesFromAssetCandidates(assetCandidateID, fileID, (response) =>{ if (response.success) { Debug.Log("Successfully removed file from asset candidate"); } else { Debug.Log("Error removing file from asset candidate"); }});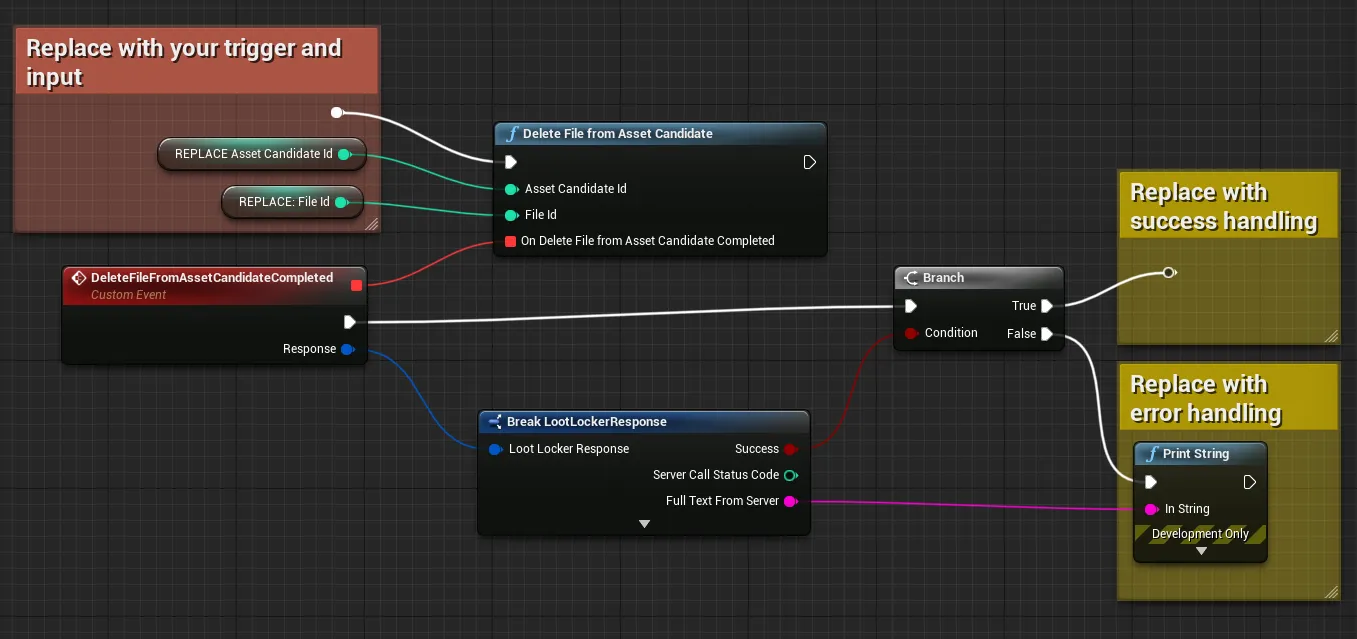
Coming soon — this sample hasn't been written yet. In the meantime, refer to the Reference Documentation for this endpoint.
curl -X DELETE "https://api.lootlocker.io/game/v1/player/assets/candidates/1234/file/5678" \ -H "x-session-token: your_token_here"Update an Asset Candidate
Section titled “Update an Asset Candidate”bool isCompleted = false;// When updating an asset, all properties are optional.// Empty fields are also updated, only update the ones that you want to replacestring name = "New Name"; // OptionalDictionary<string, string> kv_storage = new Dictionary<string, string>();kv_storage.Add("key", "value"); // OptionalDictionary<string, string> filters = new Dictionary<string, string>();filters.Add("key", "value"); // OptionalDictionary<string, string> data_entities = new Dictionary<string, string>();filters.Add("data", "name"); // Optionalint context_id = -1; // OptionalLootLockerSDKManager.UpdatingAnAssetCandidate(asset_candidate_id, isCompleted, (response) =>{ if (response.success) { Debug.Log("Successfully updated asset candidate with ID: " + response.asset_candidate.id); } else { Debug.Log("Error updating asset candidate"); }}, name, kv_storage, filters, data_entities, context_id);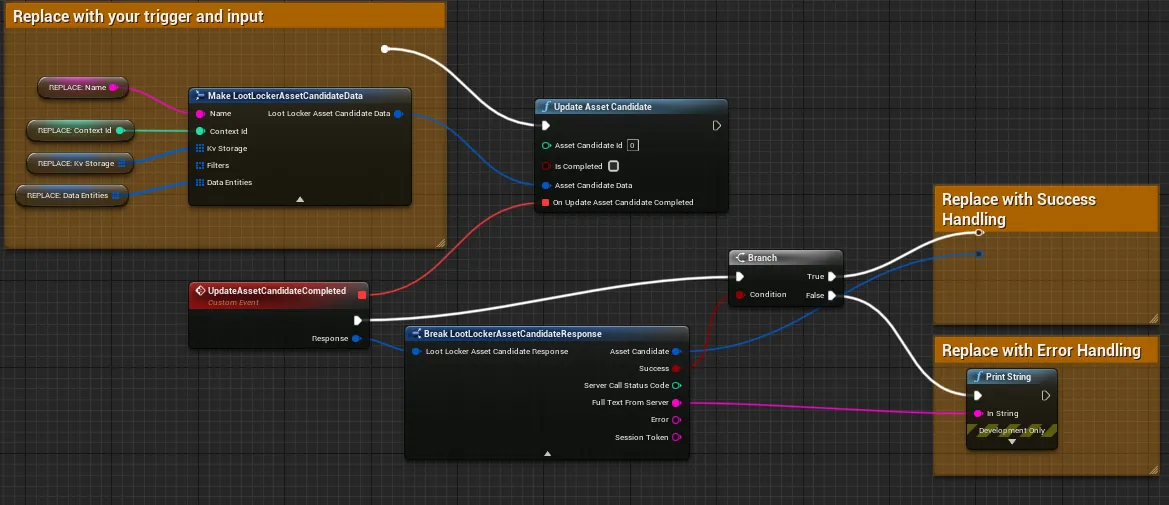
When updating the Asset Candidate, you need to set every value, not just the ones you want to change — empty fields are also updated. Start from the non-updated version's data and update from there.
Coming soon — this sample hasn't been written yet. In the meantime, refer to the Reference Documentation for this endpoint.
curl -X PUT "https://api.lootlocker.io/game/v1/player/assets/candidates/1234" \ -H "x-session-token: your_token_here" \ -H "Content-Type: application/json" \ -d "{\"completed\": true, \"data\": {\"name\": \"My Renamed Asset Candidate\"}}"See the Reference Documentation for a list of supported update properties.
When you're satisfied with the changes to the Asset Candidate, call UpdatingAnAssetCandidate() again with isCompleted set to true, and the Asset Candidate is promoted to a UGC Asset visible to all your players.
Conclusion
Section titled “Conclusion”You've created a UGC Asset Candidate, added information to it, and promoted it to an Asset. If UGC moderation is enabled in your game, the new Asset appears in the UGC moderation tab in the Web Console for you to review. If moderation is disabled, the Asset is available immediately to your players through any of the ListAssets() functions. Consider also giving players a way to report UGC content they encounter.